Building a Simple Photo Gallery App in SwiftUI: Complete Tutorial Guide
Want to create a beautiful photo gallery app in SwiftUI? This comprehensive tutorial will guide you through building a modern photo viewing application with grid layout and zoom capabilities. Perfect for both beginners and intermediate iOS developers.
In this tutorial, we’ll walk through creating a simple photo gallery app that displays a grid of images and allows users to view and zoom into individual photos. You’ll learn essential SwiftUI concepts and best practices for handling images in iOS apps.
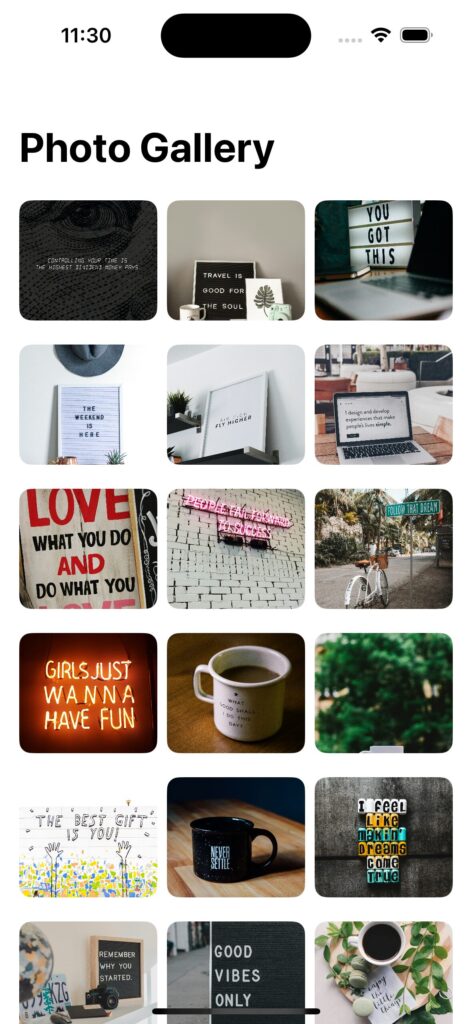
What We’re Building
Our app will have two main screens:
-
A grid view showing thumbnails of all our photos
-
A detail view where users can see a larger version of a photo and zoom in

Let’s break down the key components and explain how they work.
Prerequisites
Before we begin, make sure you have:
- Xcode 15 or later
- Basic understanding of SwiftUI
- iOS 16+ device or simulator
- Familiarity with Swift programming
Implementation Steps
1. Setting Up the Project Structure
First, let’s create a clean, organized project structure:
// PhotoGallery
// ├── Models
// │   └── Photo.swift
// ├── Views
// │   ├── PhotoGridView.swift
// │   └── PhotoDetailView.swift
// └── Utilities
//     └── ImageLoader.swift
2. Creating the Photo Model
struct Photo: Identifiable {
    let id = UUID()
    let imageName: String
    var thumbnail: UIImage?
    var fullSize: UIImage?
}
3. Building the Grid View
Our grid view uses LazyVGrid for efficient scrolling and memory management:
struct PhotoGridView: View {
    let columns = [
        GridItem(.adaptive(minimum: 100), spacing: 2)
    ]

    var body: some View {
        ScrollView {
            LazyVGrid(columns: columns, spacing: 2) {
                ForEach(photos) { photo in
                    NavigationLink(destination: PhotoDetailView(photo: photo)) {
                        PhotoThumbnailView(photo: photo)
                    }
                }
            }
            .padding(.horizontal, 2)
        }
    }
}
4. Implementing the Detail View
The detail view includes zooming capabilities:
struct PhotoDetailView: View {
    let photo: Photo
    @State private var scale: CGFloat = 1.0
    @State private var lastScale: CGFloat = 1.0

    var body: some View {
        Image(photo.imageName)
            .resizable()
            .aspectRatio(contentMode: .fit)
            .scaleEffect(scale)
            .gesture(MagnificationGesture()
                .onChanged { value in
                    let delta = value / lastScale
                    lastScale = value
                    scale *= delta
                }
                .onEnded { _ in
                    lastScale = 1.0
                }
            )
    }
}
Performance Optimization
To ensure smooth performance, we’ve implemented several optimizations:
- Lazy Loading: Using LazyVGrid for efficient memory usage
- Image Caching: Implementing a simple cache system
- Thumbnail Generation: Creating smaller images for the grid view
- Memory Management: Proper cleanup of unused resources
Best Practices
When building your photo gallery app, follow these best practices:
- Error Handling: Implement proper error handling for image loading
- Accessibility: Add VoiceOver support and proper labels
- Memory Management: Release unused images
- Performance: Use appropriate image sizes
- User Experience: Add loading indicators and smooth animations
Common Challenges and Solutions
Challenge 1: Memory Management
When dealing with large images:
class ImageCache {
    static let shared = ImageCache()
    private var cache: NSCache<NSString, UIImage> = {
        let cache = NSCache<NSString, UIImage>()
        cache.countLimit = 100
        return cache
    }()
}
Challenge 2: Image Loading Performance
Implement efficient image loading:
func loadImage(named: String) async throws -> UIImage {
    if let cached = ImageCache.shared.image(forKey: named) {
        return cached
    }
    // Load and cache image
}
Testing
Test your app thoroughly:
- Test with various image sizes
- Check memory usage
- Verify zoom functionality
- Test on different devices
- Verify grid layout on different orientations
Next Steps
Consider these enhancements:
- Add photo selection capability
- Implement sharing features
- Add photo metadata display
- Implement search functionality
- Add custom transitions
Conclusion
You’ve now built a fully functional photo gallery app in SwiftUI! This implementation provides a solid foundation for further enhancements and customization. The app demonstrates important concepts like:
- Grid layout implementation
- Image handling in SwiftUI
- Gesture recognition
- Navigation
- Basic state management with
@Stateand@Binding
Resources
Feel free to expand on this app by adding your own photos, implementing more features, or customizing the design to make it your own!
This tutorial is part of our SwiftUI series. Check out our other tutorials on iOS development and SwiftUI.
Need iOS Help?
I help developers with:
- Bug fixes & debugging
- App Store rejections
- Code review & mentoring
- Claude Code training for iOS
10+ years iOS • 10+ published apps • 11,000+ students trained
