How to programmatically add AutoLayout constraints?
AutoLayout solves the mystery when designing app for more than one screen size and for both Portrait and Landscape orientation. This is done by adding constraints to the views using various Auto Layout options available as part of Interface Builder. As an iOS developer, you can also add these constraints programmatically using NSLayoutConstraints or Visual Format Languages. In this tutorial we will see how to use NSLayoutConstraints for adding constraints to the views.
Screen Design For this Demo
For this demo, we will design something similar to flag of England by adding all the views and constraints programmatically.

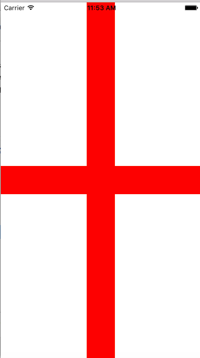
Overview of Steps
The following will be done to create the UI programmatically.
-
Change the background colour of View to Red
-
Add four rectangular views of equal widths on top left, top right, bottom left and bottom right of the parent view. The background colour for all these views will be set to red and Super View to red
-
Pin the four rectangular views to the corresponding corner by adding constraints.
-
Add constraints to the views to leave constant gap between each views (white background). This would ensure red line is shown in between these views.
-
Disable AutoResizingMasks for the four sub views.
Project Setup
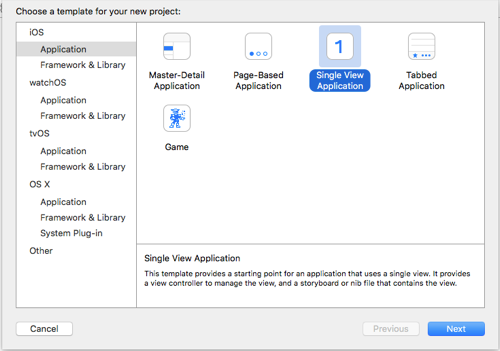
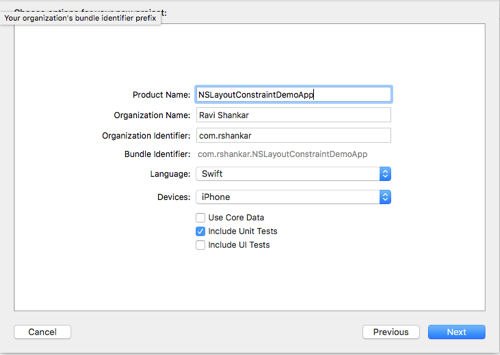
Create a new Xcode project by selecting Single View Application for the project template. Also choose the language and Swift and iPhone for Devices.
Create Views
Navigate to ViewController.swift file and add the following code snippet after the class declaration and above the viewDidLoad() function.
    private let SCREEN_SIZE = UIScreen.main.bounds
    private let GAP_BETWEEN_VIEWS:CGFloat = 0.08

    // Create four Subviews

    var topLeftView = UIView()
    var topRightView = UIView()
    var bottomLeftView = UIView()
    var bottomRightView = UIView()
The above set of code creates two constants which stores the screen size and specifies the gap between the views. Then we have created four variables that holds the instance of four views.
Add the following addViews functions below the viewDidLoad method
func addViews() {
let heightOfSubView = SCREEN_SIZE.height / 2 - SCREEN_SIZE.height * GAP_BETWEEN_VIEWS/2
let widthOfSubView = SCREEN_SIZE.width / 2 - SCREEN_SIZE.height * GAP_BETWEEN_VIEWS/2

// Calculate the height and size of each views
topLeftView = UIView(frame: CGRect(x: 0, y: 0, width: widthOfSubView, height: heightOfSubView))
topRightView = UIView(frame: CGRect(x: widthOfSubView + (SCREEN_SIZE.height * GAP_BETWEEN_VIEWS), y: 0, width: widthOfSubView, height: heightOfSubView))
bottomLeftView = UIView(frame: CGRect(x: 0, y: heightOfSubView + (SCREEN_SIZE.height * GAP_BETWEEN_VIEWS), width: widthOfSubView, height: heightOfSubView))
bottomRightView = UIView(frame: CGRect(x: widthOfSubView + (SCREEN_SIZE.height * GAP_BETWEEN_VIEWS), y: heightOfSubView + (SCREEN_SIZE.height * GAP_BETWEEN_VIEWS), width: widthOfSubView, height: heightOfSubView))

topLeftView.backgroundColor = UIColor.whiteColor()
topRightView.backgroundColor = UIColor.whiteColor()
bottomLeftView.backgroundColor = UIColor.whiteColor()
bottomRightView.backgroundColor = UIColor.whiteColor()

view.addSubview(topLeftView)
view.addSubview(topRightView)
view.addSubview(bottomLeftView)
view.addSubview(bottomRightView)
}
The addViews function, calculates the height and width of each subview (rectangular view with white background). Then the four views are created with positioning them in the corresponding corners i.e topLeft, topRight, bottomLeft and bottomRight. The background colour for these views are set White then they added to parent view using addSubView method.
Now call this addViews function inside viewDidLoad method. Also make sure to set the background colour of parent view to red.
override func viewDidLoad() {
super.viewDidLoad()
view.backgroundColor = UIColor.redColor()
addViews()
}
Compiling and running this app on iPhone 6 simulator, the portrait mode should look as shown below
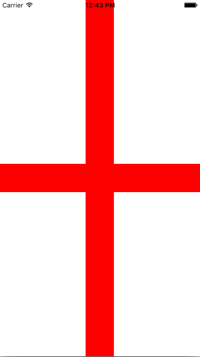
And in Landscape mode the views are randomly placed. Let us now fix this by adding the required constraints for all the veiws.

Add Constraints
In order to pin the four subviews, we need to add Leading, Traling, Top and Bottom constraints for the views based on their position. For example the top left view needs a leading and top constraint to the superview. The below screenshot should give a better understanding of constraints required for each view. And we will be adding these constraints using NSLayoutConstraint class
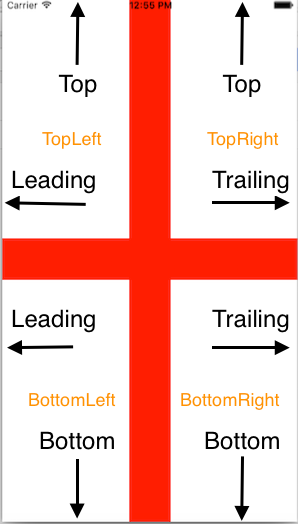
Pin the views to the side
Add the following code snippet that which creates Leading and Top constraint for TopLeft view.
  func addtopLeftViewConstraints() {
        let topLeftViewLeadingConstraint = NSLayoutConstraint(item: topLeftView, attribute: NSLayoutConstraint.Attribute.leading, relatedBy: NSLayoutConstraint.Relation.equal
                                                              , toItem: view, attribute: NSLayoutConstraint.Attribute.leading, multiplier: 1, constant: 0)

        let topLeftViewTopConstraint = NSLayoutConstraint(item: topLeftView, attribute: NSLayoutConstraint.Attribute.top, relatedBy: NSLayoutConstraint.Relation.equal
                                                          , toItem: view, attribute: NSLayoutConstraint.Attribute.top, multiplier: 1, constant: 0)

        NSLayoutConstraint.activate([topLeftViewLeadingConstraint, topLeftViewTopConstraint])
    }
First we create a leading constraint to the topLeft view and super view. Then a top constraint is added for topLeft view to the SuperView. Constant refers to the gap between the views using attribute we specify the Leading or Top attributes. Since we do not need any gap between corners the constant value is set to 0. Finally we add these constraints for the view by using the activateConstraints function in NSLayoutConstraint class.
Now let us repeat the above steps topRight. bottomLeft and bottomLeft Views.
    func addTopRightViewConstraints() {

        let topRightViewTrailingConstraint = NSLayoutConstraint(item: topRightView, attribute: NSLayoutConstraint.Attribute.trailing, relatedBy: NSLayoutConstraint.Relation.equal
                                                                , toItem: view, attribute: NSLayoutConstraint.Attribute.trailing, multiplier: 1, constant: 0)

        let topRightViewTopConstraint = NSLayoutConstraint(item: topRightView, attribute: NSLayoutConstraint.Attribute.top, relatedBy: NSLayoutConstraint.Relation.equal
                                                           , toItem: view, attribute: NSLayoutConstraint.Attribute.top, multiplier: 1, constant: 0)

        NSLayoutConstraint.activate([topRightViewTrailingConstraint, topRightViewTopConstraint])
    }

    func addBottomLeftViewConstraints() {

        let bottomLeftViewLeadingConstraint = NSLayoutConstraint(item: bottomLeftView, attribute: NSLayoutConstraint.Attribute.leading, relatedBy: NSLayoutConstraint.Relation.equal
                                                                 , toItem: view, attribute: NSLayoutConstraint.Attribute.leading, multiplier: 1, constant: 0)

        let bottomLeftViewBottomConstraint = NSLayoutConstraint(item: bottomLeftView, attribute: NSLayoutConstraint.Attribute.bottom, relatedBy: NSLayoutConstraint.Relation.equal
                                                                , toItem: view, attribute: NSLayoutConstraint.Attribute.bottom, multiplier: 1, constant: 0)

        NSLayoutConstraint.activate([bottomLeftViewLeadingConstraint, bottomLeftViewBottomConstraint])

    }

  func addBottomRightViewConstraints() {

        let bottomRightViewTrailingConstraint = NSLayoutConstraint(item: bottomRightView, attribute: NSLayoutConstraint.Attribute.trailing, relatedBy: NSLayoutConstraint.Relation.equal
                                                                   , toItem: view, attribute: NSLayoutConstraint.Attribute.trailing, multiplier: 1, constant: 0)

        let bottomRightViewBottomConstraint = NSLayoutConstraint(item: bottomRightView, attribute: NSLayoutConstraint.Attribute.bottom, relatedBy: NSLayoutConstraint.Relation.equal
                                                                 , toItem: view, attribute: NSLayoutConstraint.Attribute.bottom, multiplier: 1, constant: 0)

        NSLayoutConstraint.activate([bottomRightViewTrailingConstraint, bottomRightViewBottomConstraint])
    }
Leave space between views
We need leave constant space in the middle between these views. This can be achieved by adding constriants between the top/bottom views and left/right views. So basically we need to add two vertical spacing and two horizontal spacing constraints.
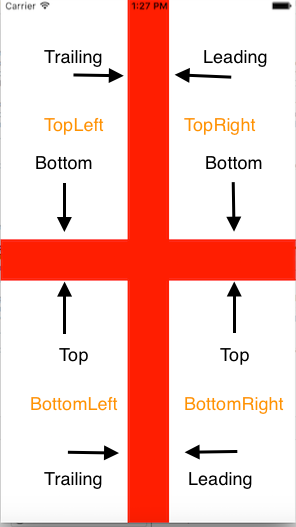
The below code snippet adds the required spacing constraings between views by specifying a constant value. Then activate these constraints by calling NSLayoutConstraint.activateConstraint.
    func addTopBottomConstraints() {
        let verticalSpacing1 = NSLayoutConstraint(item: bottomLeftView, attribute: NSLayoutConstraint.Attribute.top, relatedBy: NSLayoutConstraint.Relation.equal, toItem: topLeftView, attribute: NSLayoutConstraint.Attribute.bottom, multiplier: 1, constant: (SCREEN_SIZE.height * GAP_BETWEEN_VIEWS))

        let verticalSpacing2 = NSLayoutConstraint(item: bottomRightView, attribute: NSLayoutConstraint.Attribute.top, relatedBy: NSLayoutConstraint.Relation.equal, toItem: topRightView, attribute: NSLayoutConstraint.Attribute.bottom, multiplier: 1, constant: (SCREEN_SIZE.height * GAP_BETWEEN_VIEWS))


        NSLayoutConstraint.activate([verticalSpacing1, verticalSpacing2])

    }


    func addLeftRightConstraints() {

        let horizontalSpacing1 = NSLayoutConstraint(item: topRightView, attribute: NSLayoutConstraint.Attribute.leading, relatedBy: NSLayoutConstraint.Relation.equal, toItem: topLeftView, attribute: NSLayoutConstraint.Attribute.trailing, multiplier: 1, constant: (SCREEN_SIZE.height * GAP_BETWEEN_VIEWS))

        let horizontalSpacing2 = NSLayoutConstraint(item: bottomRightView, attribute: NSLayoutConstraint.Attribute.leading, relatedBy: NSLayoutConstraint.Relation.equal, toItem: bottomLeftView, attribute: NSLayoutConstraint.Attribute.trailing, multiplier: 1, constant: (SCREEN_SIZE.height * GAP_BETWEEN_VIEWS))

        NSLayoutConstraint.activate([horizontalSpacing1, horizontalSpacing2])

    }
Add Equal Width and Equal Height
Now add Equal Width and Equal Height constraints for topRight, bottomLeft and bottomRight views based on topLeft View. The code snippet for EqualWidth and EqualHeight is given below. The first function adds equal width constaints for all the three views based on TopLeft view. Similarly the second function adds equal height constraints based on the TopLeft view.
    func addEqualWidthConstraints() {
        let topRightViewWidth = NSLayoutConstraint(item: topLeftView, attribute: NSLayoutConstraint.Attribute.width, relatedBy: NSLayoutConstraint.Relation.equal, toItem: topRightView, attribute: NSLayoutConstraint.Attribute.width, multiplier: 1, constant: 0)

        let bottomLeftViewWidth = NSLayoutConstraint(item: topLeftView, attribute: NSLayoutConstraint.Attribute.width, relatedBy: NSLayoutConstraint.Relation.equal, toItem: bottomLeftView, attribute: NSLayoutConstraint.Attribute.width, multiplier: 1, constant: 0)

        let bottomRightViewWidth = NSLayoutConstraint(item: topLeftView, attribute: NSLayoutConstraint.Attribute.width, relatedBy: NSLayoutConstraint.Relation.equal, toItem: bottomRightView, attribute: NSLayoutConstraint.Attribute.width, multiplier: 1, constant: 0)

        NSLayoutConstraint.activate([topRightViewWidth, bottomLeftViewWidth,bottomRightViewWidth ])
    }


    func addEqualHeightConstraints() {
        let topRightViewHeight = NSLayoutConstraint(item: topLeftView, attribute: NSLayoutConstraint.Attribute.height, relatedBy: NSLayoutConstraint.Relation.equal, toItem: topRightView, attribute: NSLayoutConstraint.Attribute.height, multiplier: 1, constant: 0)

        let bottomLeftViewHeight = NSLayoutConstraint(item: topLeftView, attribute: NSLayoutConstraint.Attribute.height, relatedBy: NSLayoutConstraint.Relation.equal, toItem: bottomLeftView, attribute: NSLayoutConstraint.Attribute.height, multiplier: 1, constant: 0)

        let bottomRightViewHeight = NSLayoutConstraint(item: topLeftView, attribute: NSLayoutConstraint.Attribute.height, relatedBy: NSLayoutConstraint.Relation.equal, toItem: bottomRightView, attribute: NSLayoutConstraint.Attribute.height, multiplier: 1, constant: 0)

        NSLayoutConstraint.activate([topRightViewHeight, bottomLeftViewHeight,bottomRightViewHeight ])
    }
Disable AutoResizingMasks
Finally we need to disable the auto resizing masks for all the views to prevent constraints getting automatically based on the autoResizingMask property. The autoResizingMask property is set to true when the views are added programmtically added so we need make sure that this property for all these views are set to false.
   func disableAutoResizingMasks() {
        topLeftView.translatesAutoresizingMaskIntoConstraints = false
        topRightView.translatesAutoresizingMaskIntoConstraints = false
        bottomLeftView.translatesAutoresizingMaskIntoConstraints = false
        bottomRightView.translatesAutoresizingMaskIntoConstraints = false
    }
Just to make code little organized, we can create a new function that calls these constraints functions.
 func addConstraints() {
        addtopLeftViewConstraints()
        addTopRightViewConstraints()
        addBottomLeftViewConstraints()
        addBottomRightViewConstraints()
        addTopBottomConstraints()
        addLeftRightConstraints()
        addEqualWidthConstraints()
        addEqualHeightConstraints()
        disableAutoResizingMasks()
    }
Then call the addConstraints function in viewDidLoad method
override func viewDidLoad() {
super.viewDidLoad()

view.backgroundColor = UIColor.redColor()

addViews()
addConstraints()
}

If you need any assistance in Auto Layout, check out our new iOS 9 Auto Layout Tutorials.
Download the source code from GitHub
