How to reduce size of document with images in Microsoft Word
Microsoft Word provides users with the option to reduce the file size of the document with images. In this tutorial, we will see the technique of reducing the file size in Word 2013 and Word 2011 for Mac.
Reduce images size in Word 2013
Word 2013 users can use the Compress Pictures option available as part of Format Picture to compress the images in the document.
Step 1: Click the Format menu in Microsoft Word 2013. Please note the Format menu will be available only after selecting the image on the document.
Step 2: In the Format menu, navigate to Adjust section and click the Compress Pictures option. This should display the following Compress Pictures window.
Now you can choose the desired option under Compression options and Target Output. Let say you want to only share the document with other users using email, then go for “E-mail (96 ppi): minimize document size for sharing”.
Step 3: After selecting the required options, click Ok button to apply the changes to images.
Compress images in Word 2011 for Mac
Step 1: Select the image in the document and click Format Picture menu.

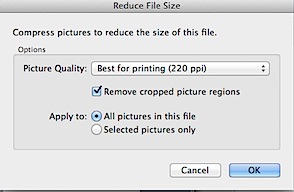
Step 2: Under Format Picture menu, click the Compress Option. This should display the following Reduce File Size screen.

Step 3: Now choose the Picture Quality drop down to apply appropriate picture quality as per your needs. You can apply the changes to all the pictures in the file or just Selected pictures
Step 4: Click OK button to apply the changes to the document.


