• Skip to main content
  • Skip to primary sidebar

Ravi Shankar

Tweaking Apps

  • Swift
  • Tech Tips
You are here: Home / Office / Remove page number from selected pages in Word

Remove page number from selected pages in Word

June 16, 2015 By Ravi Shankar 6 Comments

This is in response to the query posted by a reader that

How to remove a page number without removing all page numbers.

Word 2016, 2013 and 2010 have a feature that allows users to remove page number for selected pages alone. The option is know as “Section Break” and it is available as part of the Page Setup menu. For example if you have 5 pages in a document and want to remove the page number for the 4th Page then you can follow the below mentioned steps.

Step 1:- In the Word document, scroll down to the page with number as 4.

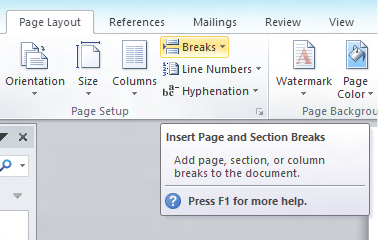
Step 2:- Navigate to Page Layout menu then click the Break menu option under Page Setup section.

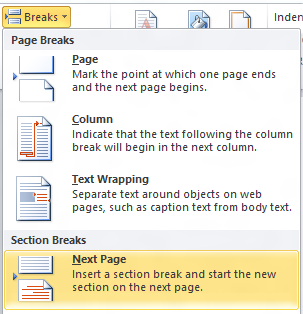
Step 3 :- Select Next Page from the Breaks menu drop down list.

Step 4 :- Then double click the Footer of the new page section.

Step 5 :- Select Same as Previous option in the document and un select the Link to Previous available under the Header & Footer Tools.

Step 6 :- Now you can edit or remove the page number from only the selected page.

Filed Under: Office, Word 2016 Tagged With: remove page numbers

Reader Interactions

Comments

  1. Richard says

    October 2, 2019 at 10:43 am

    Doesn’t work in word 2010 as there are no such options as “link to previous”.

    Reply
    • Carol says

      November 5, 2019 at 1:27 am

      It took me way too long to find the “link to previous” – when you’re in the header/footer editor, it’s in the ribbon at the top of the page, not in the document.

      Reply
  2. Debajyoti says

    June 22, 2021 at 7:34 pm

    Very useful! Thank you so much!!!

    Reply
  3. Sandip Kumar Ghosh says

    April 26, 2022 at 12:30 pm

    GREAT. It worked for me.
    Thanks.

    Reply
  4. Sarita Marcos says

    May 5, 2022 at 3:24 pm

    Very helpful! Thank you!

    Reply
  5. niki lynx says

    January 2, 2023 at 9:14 am

    Got it like magic. Many thanks.

    Reply

Leave a Reply Cancel reply

Your email address will not be published. Required fields are marked *

This site uses Akismet to reduce spam. Learn how your comment data is processed.

Primary Sidebar

TwitterLinkedin

Recent Posts

  • How to block keywords in Jio broadband
  • How to disable opening an app automatically at login in Mac
  • How to set preferred Wifi network on Mac
  • Attribute Unavailable: Estimated section warning before iOS 11.0
  • How to recover Firefox password from Time Machine backup

Pages

  • About
  • Privacy Policy
  • Terms and Conditions

Copyright 2022 © rshankar.com

Terms and Conditions - Privacy Policy