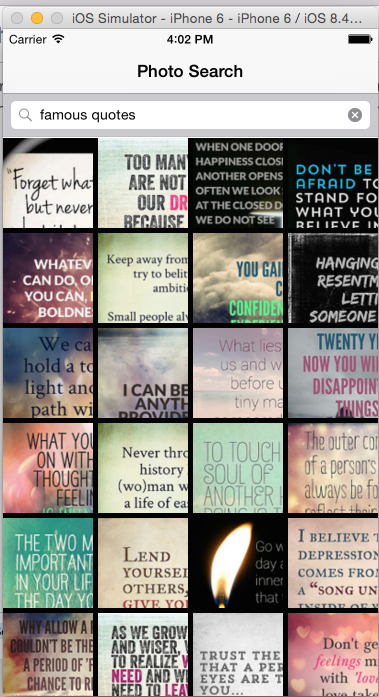
Building an iOS Photo Search App with Pixabay API, Alamofire, and SDWebImage
In this tutorial, we’ll walk through the steps to create a demo app that retrieves photos from Pixabay based on search text and displays them in a UICollectionView. We’ll also cover how to integrate third-party libraries using CocoaPods.
Pixabay API
First, register your app with Pixabay and obtain an API key. You’ll need this key to access the Pixabay Photo Search API.
Project Setup
-
Create a new project by selecting the Single View Application template and choosing Swift as the language.
-
We’ll use CocoaPods to install third-party libraries. Make sure CocoaPods is installed on your Mac.
-
In a terminal window, navigate to your project folder and create a file named
Podfile. Add the following content:
rubyCopyuse_frameworks! pod 'Alamofire' pod 'SwiftyJSON' pod 'SDWebImage'
-
Run
pod installin the terminal. This will install the required libraries and create the necessary workspace. -
Open
<Project Name>.xcworkspaceto add functionality to the project.
Model Class
Create a new file named Photo.swift to store photo details:
import SwiftyJSON

struct Photo {
    let id: Int
    let pageURL: String
    let previewURL: String
    let largeImageURL: String

    init(json: JSON) {
        id = json["id"].intValue
        pageURL = json["pageURL"].stringValue
        previewURL = json["previewURL"].stringValue
        largeImageURL = json["largeImageURL"].stringValue
    }
}
Web Service Integration
Create a new file named Services.swift and add the following code:
import Alamofire
import SwiftyJSON

protocol PixabayPhotoDownloadDelegate: AnyObject {
    func finishedDownloading(photos: [Photo])
}

class Services {
    let API_KEY = "YOUR_PIXABAY_API_KEY"
    let URL = "https://pixabay.com/api/"

    weak var delegate: PixabayPhotoDownloadDelegate?

    func makeServiceCall(searchText: String) {
        let parameters: [String: Any] = [
            "key": API_KEY,
            "q": searchText,
            "per_page": 30
        ]

        AF.request(URL, method: .get, parameters: parameters).responseJSON { response in
            switch response.result {
            case .success(let value):
                let json = JSON(value)
                let photos = json["hits"].arrayValue.map { Photo(json: $0) }
                self.delegate?.finishedDownloading(photos: photos)
            case .failure(let error):
                print("Request failed with error: \(error)")
            }
        }
    }
}
Design User Intrerfaces
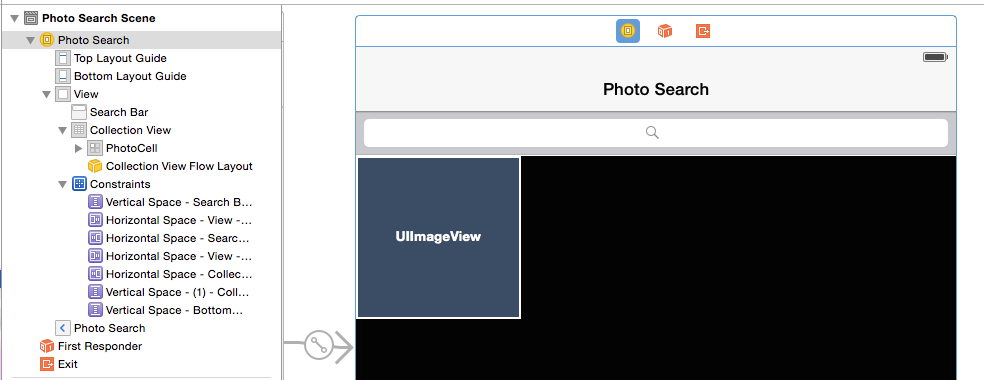
Navigate to Main.storyboard, add a UICollectionView and UISearchBar to the ViewController as shown in the below screenshot.
In Main.storyboard, add a UICollectionView and UISearchBar to the ViewController.Add Auto Layout constraints to ensure the UI looks good on both iPad and iPhone.Add a UIImageView to the CollectionViewCell.Embed the ViewController in a Navigation Controller.Add a second View Controller to act as the Detail View Controller for displaying selected photos. If you need help with Auto Layout then check out this tutorial.
Add Custom Cell
Create a new file named PhotoCell.swift:
import UIKit

class PhotoCell: UICollectionViewCell {
    @IBOutlet weak var imageView: UIImageView!
}
Set this class as the Custom Class for UICollectionViewCell in Interface Builder.
Add PhotosViewController
Rename ViewController.swift to PhotosViewController.swift. Update the class as follows
import UIKit
import SDWebImage

class PhotosViewController: UIViewController, UISearchBarDelegate, PixabayPhotoDownloadDelegate {

    @IBOutlet weak var searchBar: UISearchBar!
    @IBOutlet weak var collectionView: UICollectionView!

    var service: Services = Services()
    var photos: [Photo] = []

    let reuseIdentifier = "PhotoCell"

    override func viewDidLoad() {
        super.viewDidLoad()

        collectionView.dataSource = self
        searchBar.delegate = self
        collectionView.delegate = self
        service.delegate = self

        searchBar.text = "nature"
        searchForPhotos()
    }

    func searchBarSearchButtonClicked(_ searchBar: UISearchBar) {
        searchForPhotos()
        searchBar.resignFirstResponder()
    }

    func searchForPhotos() {
        service.makeServiceCall(searchText: searchBar.text!)
    }

    func finishedDownloading(photos: [Photo]) {
        DispatchQueue.main.async {
            self.photos = photos
            self.collectionView?.reloadData()
        }
    }
}

extension PhotosViewController: UICollectionViewDataSource, UICollectionViewDelegateFlowLayout {
    func collectionView(_ collectionView: UICollectionView, numberOfItemsInSection section: Int) -> Int {
        return photos.count
    }

    func collectionView(_ collectionView: UICollectionView, cellForItemAt indexPath: IndexPath) -> UICollectionViewCell {
        let cell = collectionView.dequeueReusableCell(withReuseIdentifier: reuseIdentifier, for: indexPath) as! PhotoCell
        let photo = photos[indexPath.row]

        cell.imageView.frame.size = cell.frame.size
        if let url = URL(string: photo.previewURL) {
            cell.imageView.sd_setImage(with: url, placeholderImage: UIImage(named: "placeholder"))
        }

        return cell
    }

    func collectionView(_ collectionView: UICollectionView, layout collectionViewLayout: UICollectionViewLayout, sizeForItemAt indexPath: IndexPath) -> CGSize {
        let width = (UIScreen.main.bounds.width - 15) / 4
        return CGSize(width: width, height: width)
    }

    func collectionView(_ collectionView: UICollectionView, didSelectItemAt indexPath: IndexPath) {
        let photo = photos[indexPath.row]
        let detailViewController = storyboard?.instantiateViewController(withIdentifier: "DetailViewController") as! DetailViewController
        detailViewController.photo = photo
        present(detailViewController, animated: true, completion: nil)
    }
}
Add DetailViewController
Create a new file named DetailViewController.swift:
import UIKit
import SDWebImage

class DetailViewController: UIViewController {

    var photo: Photo?
    var imageView: UIImageView?

    override func viewDidLoad() {
        super.viewDidLoad()

        if let photo = photo {
            imageView = UIImageView(frame: CGRect(x: 0, y: 0, width: 320, height: 320))
            if let url = URL(string: photo.largeImageURL) {
                imageView?.sd_setImage(with: url, placeholderImage: UIImage(named: "placeholder"))
                view.addSubview(imageView!)

                let tapGestureRecognizer = UITapGestureRecognizer(target: self, action: #selector(close))
                view.addGestureRecognizer(tapGestureRecognizer)
            }
        }
    }

    override func viewDidLayoutSubviews() {
        super.viewDidLayoutSubviews()

        let size = view.bounds.size
        let imageSize = CGSize(width: size.width, height: size.width)
        imageView?.frame = CGRect(x: 0.0, y: (size.height - imageSize.height)/2.0, width: imageSize.width, height: imageSize.height)
    }

    @objc func close() {
        dismiss(animated: true, completion: nil)
    }
}
Download the source code from here.


