Let us see an example TaskManager app using CoreData written in Swift Programming language. This app provides the following functionality
- Allow users to enter new task
- Update existing task
- delete task
You can download source code for this project from Github. If you are familiar with user interface then move on to the Core Data implementation in Swift section
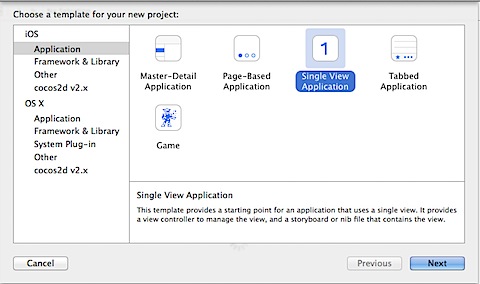
Create a new File -> New -> Project and select template Single View Application
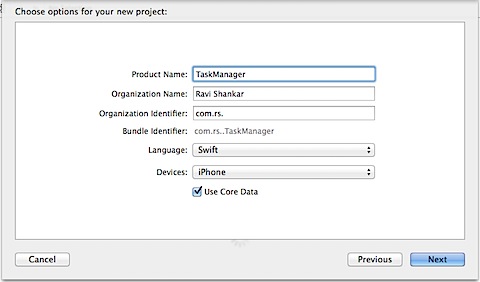
Enter Product Name, Language as Swift and select “Use Core Data” for the new Project.
User Interface Implementation
Add new TableViewController for managing tasks
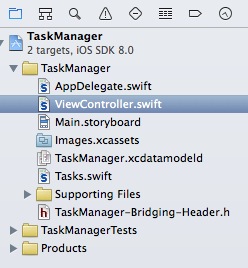
Delete ViewController.swift and Add new view controller which will be used for displaying the list of tasks.
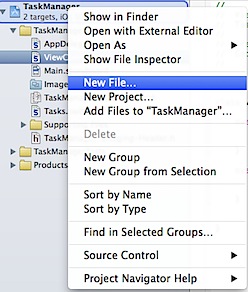
Right click on the Project and select New File
Choose the template as Cocoa Touch under iOS -> Source
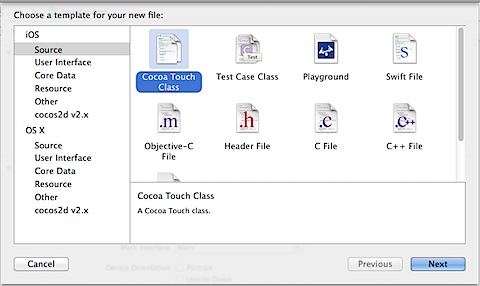
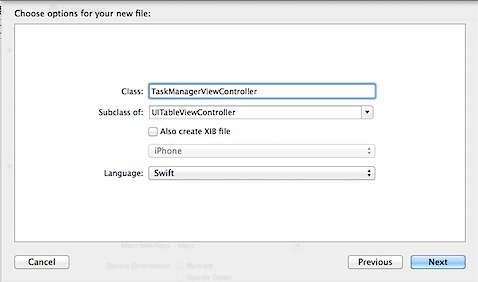
Enter name of the file as TaskManagerViewController with Subclass as UITableViewController and Language as Swift.
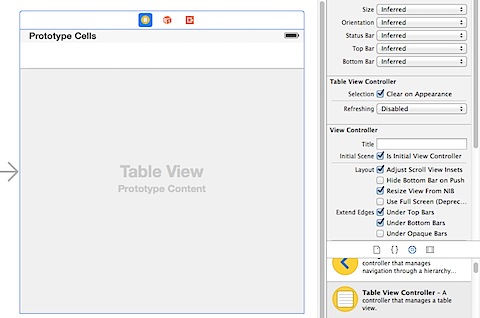
Add new UITableViewController to the Storyboard
Navigate to Main.storyboard, delete the ViewController and add new TableViewController to the Storyboard
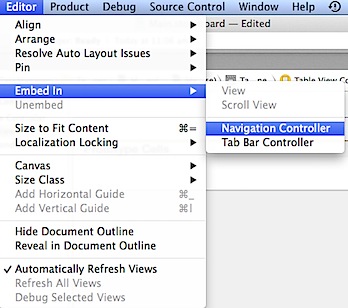
Embed this TableViewController inside a navigation controller. You can do this by clicking Editor menu -> Embed In -> Navigation Controller.
Navigate to Storyboard file and select Table View Controller. Click Identity Inspector and set the Class to the TaskManagerViewController.
Add button to the navigation bar
Users can navigate to new task screen by tapping the button on the TaskManager. Drag and drop the button bar item to the navigation bar.
In the attributes inspector, set the identifier for button bar item as Add. Also enter title as “Task Manager” in the navigation bar.
Add View Controller for entering task detail
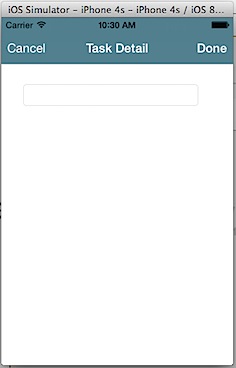
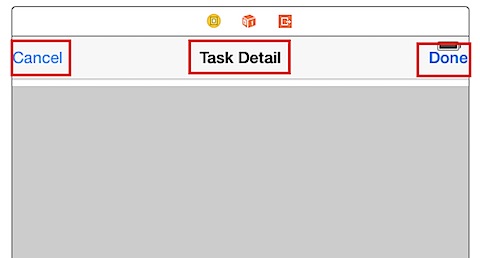
Now to enter task detail, let us add new View Controller. From the Objects library, drag and drop View Controller on to storyboard. Then drag and drop a navigation item to this View Controller. Add a Done bar button item for saving the changes, Cancel bar button item for dismissing the screen. Also provide a title for the screen as Task Detail.
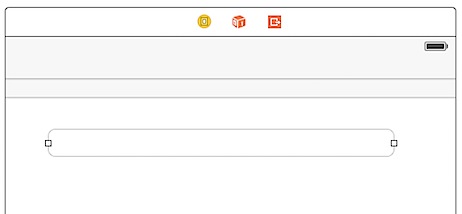
Then add a textfield to the View Controller to enter details about the task.
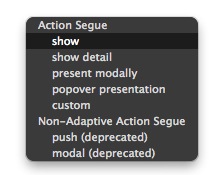
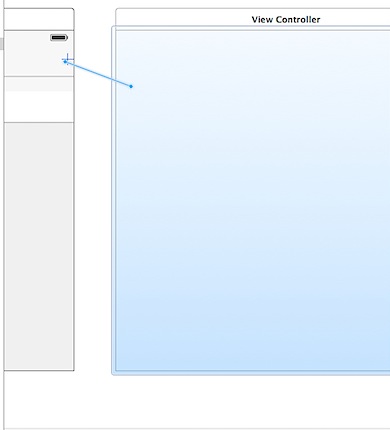
Now to connect the Task Manager screen to Task Detail screen, select the Add button in Task Manager screen, hold the control button and make a connection to the Task Detail screen. Select type of Action Segue as Show.
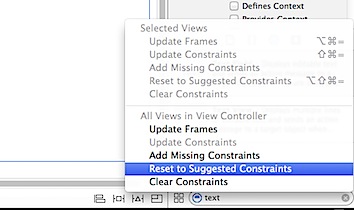
Select each View Controller and Click on the Resolve Auto Layout Issues option and pick Reset to Suggested Constraints. This would ensure that the controls alignment and display remains same in different screen sizes.
Add View Controller Class
Right click on the Project, select New File from menu list.
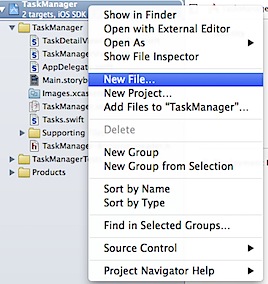
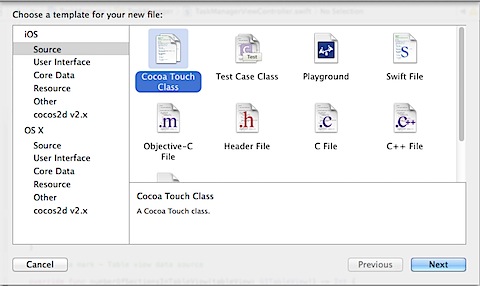
Select Cocoa Touch Class as template.
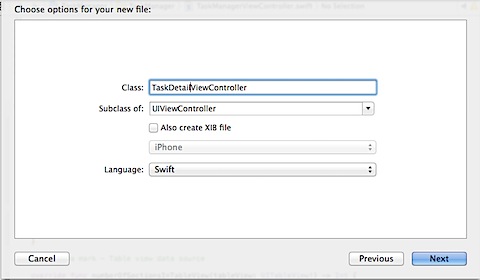
Enter the Class name as TaskDetailViewController, Subclass of UIViewController and Language as Swift.
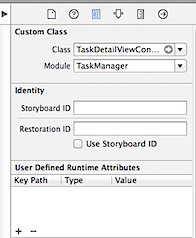
Navigate to Storyboard file and select Task Detail View Controller. Click Identity Inspector and set the Class to the TaskDetailViiewController.
Now let us add the function required for dismissing the View Controller. This gets called when user taps done and cancel buttons. Navigate to TaskDetailViewController.swift file and add the following functions.
@IBAction func done(sender: AnyObject) { if task != nil { editTask() } else { createTask() } dismissViewController() } @IBAction func cancel(sender: AnyObject) { dismissViewController() } // MARK:- Dismiss ViewControllers func dismissViewController() { navigationController?.popViewController(animated: true) }
Connect the IBActions with the corresponding done and cancel buttons
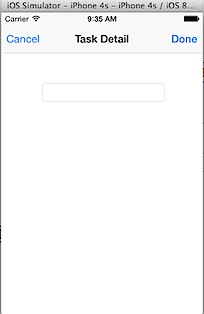
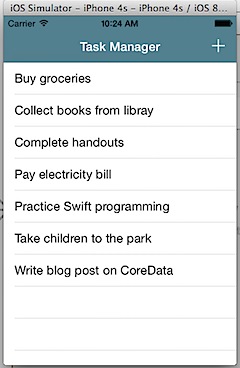
Try to compile and run the app on the Simulator. You should see the following Task Manager screen and tapping + sign should display the Task Detail screen with TextField, Cancel and Done button.
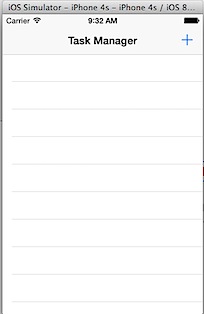
When you tap the Cancel or Done button should take you to the Task Manager screen.
Create IBOutlet element for UITextField Element
Add the following piece of code after the Class TaskDetailViewController: UIViewController
@IBOutlet var txtDesc: UITextField!
Now use the connection inspector to connect the IBOutlet variable to the textfield on the User Interface.
Core Data Implementation
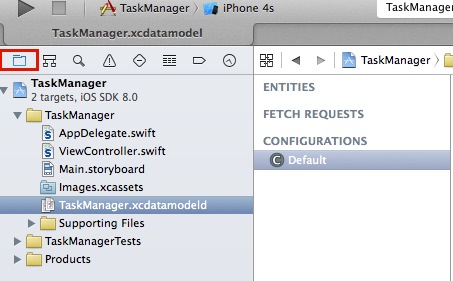
Click Show Project Navigator and select CoreData model file (ending with extension .xcdatamodelid)
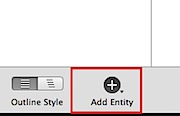
Click Add Entity option available at the bottom of Xcode Editor window.
Then enter the name of the entity as Tasks.
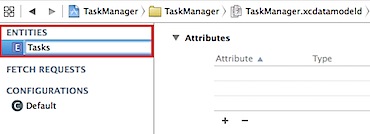
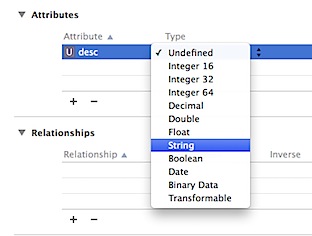
Click Add Attribute then enter name as desc and choose the type as String. This attribute will be used for storing the task detail information.
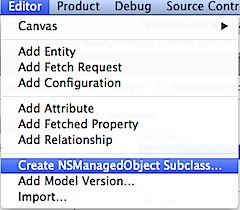
Now to generate the CoreData mapping class, click Editor and select Create NSManagedObject Subclass.
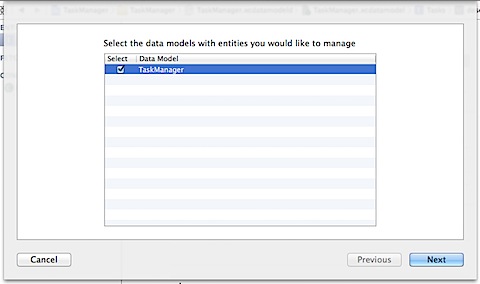
Select the data models and click Next
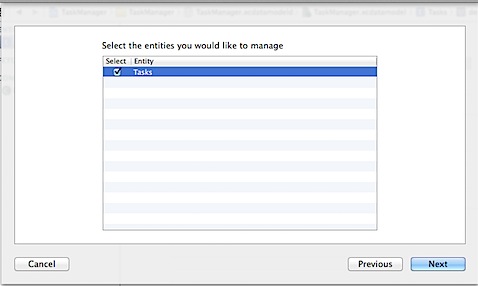
Then select entities and in this example it is Tasks
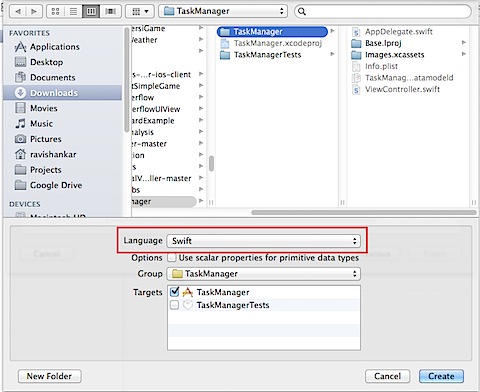
Make sure to select Language for NSManagedObject class as Swift. Click Create to the create new class.
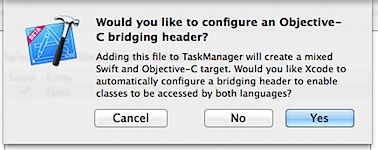
Click Yes to to configure an Objective-C birding header for the Swift class.
This should create a new class called Tasks.swfit with variable for corresponding attribute defined in Entities
Write code to save new task details
Add the following line at the top of TaskDetailViewController class
let managedObjectContext = (UIApplication.shared.delegate as! AppDelegate).managedObjectContext
The above line defines a variable to store the ManagedObjectContext. In order to save the task information entered in the UITextField, add the following code to TaskDetailViewController.swift. Then call this function in the @IBAction done.
func createTask() { let entityDescripition = NSEntityDescription.entity(forEntityName: "Tasks", in: managedObjectContext) let task = Tasks(entity: entityDescripition!, insertInto: managedObjectContext) task.desc = txtDesc.text! do { try managedObjectContext.save() } catch _ { } }
@IBAction func done(sender: AnyObject) { createTask() dismissViewController() }
The createTask function uses the Tasks Entity class and ManagedObjectContext class to save the information entered in the text field in to SQLite using CoreData.
Now if you try to run this app in Xcode simulator, you should be able to enter the details in textfield and save the task. But there is no way to see the saved tasks.
Write code to retrieve information from SQLite using NSFetchedResultsController
We will be using NSFetchedResultsController to retrieve and manage information returned from Core Data. Write the following code after the class declaration of TaskManagerViewController class
let managedObjectContext = (UIApplication.shared.delegate as! AppDelegate).managedObjectContext var fetchedResultController: NSFetchedResultsController = NSFetchedResultsController<NSFetchRequestResult>()
You might see the above error message “Use of undeclared type ’NSFetchedResultsContoller”. This can be fixed by importing CoreData module and making your class a delegate of NSFetchedResultsControllerDelegate.
import CoreData class TaskManagerViewController: UITableViewController, NSFetchedResultsControllerDelegate {
Then add the following function to populate fetchedResultController.
func getFetchedResultController() -> NSFetchedResultsController<NSFetchRequestResult> { fetchedResultController = NSFetchedResultsController(fetchRequest: taskFetchRequest(), managedObjectContext: managedObjectContext, sectionNameKeyPath: nil, cacheName: nil) return fetchedResultController }
Update the ViewDidLoad method of TableViewController to populate fetchedResultController variable and set the delegate to self and call the function to retrieve the results.
override func viewDidLoad() { super.viewDidLoad() fetchedResultController = getFetchedResultController() fetchedResultController.delegate = self do { try fetchedResultController.performFetch() } catch _ { } }
Implement the TableView related functions to display the data
Navigate to Main.storyoard then to TaskManagerViewController and set Identifier for Prototype Cells as “Cell”
Add the following functions required for population of rows in tableView and to refresh the tableView when content is changed.
And for refreshing the tableview content add the following piece of code snippet.
func controllerDidChangeContent(_ controller: NSFetchedResultsController<NSFetchRequestResult>) { tableView.reloadData() }
Swift uses namespaces for classes, so the downcast of NSManagedObject class to Tasks class will work only when you append the module name with the class for Entity
let task = fetchedResultController.object(at: indexPath as IndexPath) as! Tasks
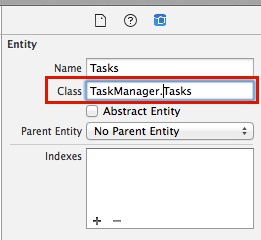
Navigate to TaskManager.xcdatamodeld, select Tasks under Entities and using the Data Model Inspector append Module name i.e TaskManager with the class.
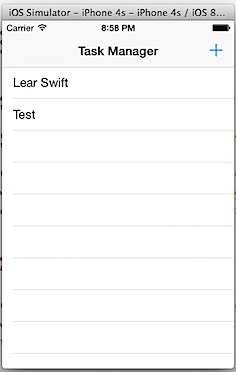
Now you should be able to see the data added via TaskDetailScreen in the TaskManager Screen.
Implementation of deleting rows from tableView and CoreData entity
Copy and paste the following code to provide the users with the option to delete the rows.
override func tableView(_ tableView: UITableView, commit editingStyle: UITableViewCell.EditingStyle, forRowAt indexPath: IndexPath) { let managedObject:NSManagedObject = fetchedResultController.object(at: indexPath as IndexPath) as! NSManagedObject managedObjectContext.delete(managedObject) do { try managedObjectContext.save() } catch _ { } }
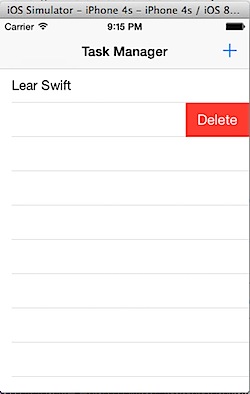
Implementation of editing task details
Now let us see how to edit a task in the TaskManager screen. We will re-use the same TaskDetail screen for editing the task information. First let create segue from UITableViewCell to TaskDetailViewController. You can do this by holding the Control key and drag and drop the connection to TaskDetailViewController.
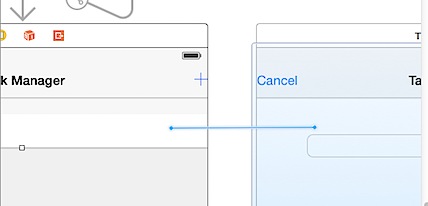
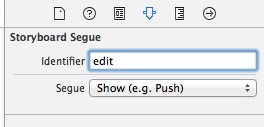
Make sure to set the Segue identifier as edit using Attributes Inspector
Add the following piece of code in TaskManagerViewController to populate the task detail for the edited row.
override func prepare(for segue: UIStoryboardSegue, sender: Any?) { if segue.identifier == "edit" { let cell = sender as! UITableViewCell let indexPath = tableView.indexPath(for: cell) let taskController:TaskDetailViewController = segue.destination as! TaskDetailViewController let task:Tasks = fetchedResultController.object(at: indexPath!) as! Tasks taskController.task = task } }
Navigate to TaskDetailViewController and variable which used to pass the task details across the ViewControllers
var task: Task? = nil
In viewDidLoad fund, populate the textField with the task details for edit operation i.e task is not nil
override func viewDidLoad() { super.viewDidLoad() if task != nil { txtDesc.text = task?.desc } }
Then add a new function to save the edited task. Also modify the done function to handle create and edit task functionality
func editTask() { task?.desc = txtDesc.text! do { try managedObjectContext.save() } catch _ { } }
@IBAction func done(sender: AnyObject) { if task != nil { editTask() } else { createTask() } dismissViewController() }
Now when you run the app in Xcode simulator, you should be able to edit the task.
The final piece of code left is to add background colour to the navigation bar for both the controllers. Click AppDelegate.swift file and add the following function. Then call this function from the didFinishLaunchingWithOptions.
func setupAppearance() { let navigationBarAppearance = UINavigationBar.appearance() navigationBarAppearance.barTintColor = UIColor(red: 51.0/255.0, green: 104.0/255.0, blue: 121.0/255.0, alpha: 1.0) navigationBarAppearance.tintColor = UIColor.white navigationBarAppearance.titleTextAttributes = [NSAttributedString.Key.foregroundColor:UIColor.white] }
Running the app on the iOS simulator should change the appearance for the navigation bar.
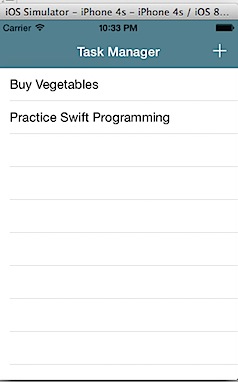
Hope you found this beginner tutorial useful. Please use the comments section to share your thoughts and suggestion
Download the source code for this tutorial from GitHub
I love this tutorial! Thanks for posting.
When trying to retrieve my list of stored tasks, the app crashes while running :
let task = fetchedResultController.objectAtIndexPath(indexPath) as Tasks and shows “Swift dynamic cast failed” in one of the threads. Any idea what might cause this? It started when I added the prototype cell into the mix, although I have assigned “Cell” as the identifier, like in the tutorial.
Please make changes to entity class name then try again.
Swift uses namespaces for classes, so the downcast of NSManagedObject class to Tasks class will work only when you append the module name with the class for Entity
let task = fetchedResultController.objectAtIndexPath(indexPath) as Tasks
Navigate to TaskManager.xcdatamodeld, select Tasks under Entities and using the Data Model Inspector append Module name i.e TaskManager with the class.
Hi,you!
Thanks for posting!
I did as your tutorial above, but do not understand why I get some errors:
“Using TaskDetailViewController.swift underclared type ‘Tasks'”
“Using underclared type ‘task’ TaskDetailViewController.swift”
“Using unresolved identifier ‘NSEntityDescription’ TaskDetailViewController.swift”
“Using TaskManagerViewController.swift underclared type ‘Tasks'”
And there are two files in the file TaskManager: Tasks.h and Tasks.m, I found a bit strange compared to the performance of your project.
I started learning about the swift, nor as desirable CoreData. I hope you can help me.Thanks!
Can you please check whether “import CoreData” added to Task TaskManagerViewController.swift file?
You have .m and .h files instead of .swift file for Tasks. When you created your Tasks file (subclass of NSManagedObject) you did not change ‘language’ from Obj-C to Swift.
Thanks Niel
Bin, can you please check as suggested by Neil.
Hi
Just working through your tutorial – just what I need for my own project, so many thanks.
I noticed on the line:
let managedObjectContext = (UIApplication.sharedApplication().delegate as AppDelegate)
that .managedObjectContext is missing from the end. Your source code is correct but it is missing from the webpage.
Thanks again.
Thank you, the webpage is updated now.
Just finished and I really am so thankful that you took the time to write this. I’ve been pulling my hair out for a few days with Core Data and Swift. Your advice about appending the module name with the class was excellent.
Just a few more typos. Hope you don’t think I’m being picky.
In ‘Implementation of editing task details’ section:
let task: Task? = nil should be let task: Tasks? = nil
edit segue has identifier = ‘edit’ but the create segue needs to have identifier = ‘create’ or some other name to prevent segue.identifier returning nil when ‘+’ is clicked. I could not find this step on the webpage but I have had some wine so maybe I missed it 🙂 Apologies if so.
In beta 4, in AppDelegate, managedObjectContext is defined as:
lazy var managedObjectContext: NSManagedObjectContext?
with the ?. So I have had to add a ! to the ‘as AppDelegate).managedObjectContext!’ in the two view controllers.
Thanks Neil for your feedback. Much appreciated!
This is a great tutorial but I’m stuck on the part about appending the module name with the class.
When I put in “TaskManager.Task” into the Entity Class field and create the subclass it generates a file titled “TaskManager.swift” and I can’t use the Task subclass. Do you have to generate the subclasses and then go back and add the module name afterwards? That doesn’t seem right…can you help me understand what I’m missing here?
Thanks!
Please generate the class then append the module name to the Entity Class field.
Great tutorial, best way I’ve seen in any tutorials of fetching from core data, far better than what I was using.
It’s been a great help to me.
Thanks
Hi instead of the data populating a table View can you set it to populate into a label on a button and when the button is pressed all the info is displayed ?
Using your example the button would read ” buy vegetables ” ( populated from the users input) and when the button is pressed it would display more info like buy carrots and cabbage.
Hope this makes sense.
I just want to make a better look app then just table views.
Will improve the user experience better design.
The app I have in mind would suite it perfect better then a boring table view.
I have made up some example diagrams to explain better but can’t post it here.
Thank for taking the time to read this .
First of all, thanks for the tutorial.
There were however some parts that got me struggling: there are some differences in the code here and in the final code you can download from github, mostly about missing ? and ! marks, and some typo’s (sometimes you use Tasks and sometimes Task as the entity name/class). However, with your final code, you can figure things out 🙂
So, thanks!
Thanks for your feedback. Will update the content soon.
Getting a UINavigationController does not have a member named popViewController error after copying that over.
Ravi – thanks for the great post.
I am unable to add a navigation item as detailed in the section “Add View Controller for entering task detail.”. I tried with adding a navigation bar (instead of navigation item). When i do this, both the main navigation control and the navigation appear on the “Task Detail” screen (Looks like this issue is similar http://stackoverflow.com/questions/23548088/storyboard-navigation-controller-and-tab-bar-controller). Could you comment on how you made this work?
Ravi – found what was causing the problem (w.r.t my previous comment). It worked when I changed the sequence of steps a bit.
1) After creating task detail view control, i added navigation item (it did not show in storyboard, but only on the explorer)
2) I created a segue from the table scene by ctrl+dragging from “+”
3) Once i did this, i was able to add item buttons
Thanks for sharing the info
I get an error if I run the app: fatal error: unexpectedly found nil while unwrapping an Optional value. It happends in this line of code in the AppDelegate.swift file: return NSManagedObjectModel(contentsOfURL: modelURL!)
in this function: lazy var managedObjectModel: NSManagedObjectModel = {
// The managed object model for the application. This property is not optional. It is a fatal error for the application not to be able to find and load its model.
let modelURL = NSBundle.mainBundle().URLForResource(“MyApp”, withExtension: “momd”)
return NSManagedObjectModel(contentsOfURL: modelURL!)
}()
I made this new Core Data wrapper for iOS in Swift – https://github.com/tadija/AERecord
You can use it to setup Core Data stack like this:
AERecord.setupCoreDataStack()
Access context for current thread like this:
AERecord.defaultContext
Save context like this:
AERecord.saveContext()
Create fetch requests like this:
NSManagedObject.create()
NSManagedObject.firstOrCreateWithAttribute(“city”, value: “Belgrade”)
NSManagedObject.deleteAll()
let predicate = …
NSManagedObject.firstWithPredicate(predicate)
NSManagedObject.allWithAttribute(“year”, value: 1984)
And much more… I hope it will be useful for someone.
I’m getting this weird error that reads use of unresolved identifier ‘presentItemInfo’ when I try and type up the viewController.swift file. I added the import coreData atop the file so I’m unsure as to why this jobbie is not working?
Excellent tutorial! Congrats! I was able to fit that right in my code. Only part that’s missing is sections. I was planning to use sections in my TableView, so did overload the section header method:
override func tableView(tableView: UITableView, titleForHeaderInSection section: Int) -> String?
{
if let sections = fetchedResultController.sections as? [NSFetchedResultsSectionInfo] {
return sections[section].name
}
return nil
}
But quite obviously the Core Data code in the tutorial is not set up to populate sections. Could you give me a pointer how to add that?
Thanks for the post
let task:Tasks = fetchedResultController.objectAtIndexPath(indexPath) as Tasks
What am I supposed to write instead of Tasks? “undeclared type” it says.
Hi
great tutorial.
I’m having a problem I think associated with tasks, like others.
in prepareforsegue function I get
UITableView numberOfRowsInSection does not have member IndexForPathForCell
and
use of undeclared type TaskDetailViewController
for the numberOfSectionsInTableView and the three other tableview override functions I get
Method does not override any method in its superclass.
As I am comparing my typing with the source files as I go, I called my app TaskManager2 so for the module, I called it TaskManager2.Tasks,
The downloaded app works fine.
I don’t understand what this sentence means:
“Navigate to TaskDetailViewController and variable which used to pass the task details across the ViewControllers”
as applied to this line of code. When I adapt it to my project, Swift tells me it can’t infer the type for my ‘contact’ equivalent.
var task: Task? = nil
Thanks for the great tutorial!!!
Am facing one issue, I have done everything but am getting a warning like: Unable to load class name TaskManager.Tasks for entity ‘Tasks’.
Class not found, using default NSManagedObject instead.
And I have appended module name in with class name in data module Inspector.
Can you please help me to resolve this!!!!
It is a very clear tutorial.
Thanks for taking the time to show us all. But, when I download the code and ran on Xcode 6.3/Swift 1.2, the iOSimulator crashed immediately when I tried to enter a task description and press “Done”. It is giving me a error as below. I made change to all the “as” to “as!” in the code and also checked your TaskManager.xcdatamodelId and the Model Inspector show correctly with Name = Tasks, and Class = TaskManager.Tasks. Have you tried your code for Xcode 6.3/Swift 1.2, or any plan to port it to 6.3. Thanks.
:2015-04-12 23:49:46.066 TaskManager[10405:363514] CoreData: warning: Unable to load class named ‘TaskManager.Tasks’ for entity ‘Tasks’. Class not found, using default NSManagedObject instead.
Could not cast value of type ‘NSManagedObject_Tasks_’ (0x7fd283585240) to ‘TaskManager.Tasks’ (0x1072a3b60).
Thanks for letting me know. Just ported the project to Swift 1.2. Let me know if you still face any issues
Hi,
thanks for this great tutorial.
Thank you for sharing your knowledge. It was very useful for me.
Gracias, muy buen ejemplo
I am using Xcode 6.4 and can’t seem to find the screen that you want us to use to append the Tasks class to the Module. I can’t find the option to do so in the data model editor. Can you explain that in further detail?
lazy var persistentStoreCoordinator: NSPersistentStoreCoordinator = {
// The persistent store coordinator for the application. This implementation creates and returns a coordinator, having added the store for the application to it. This property is optional since there are legitimate error conditions that could cause the creation of the store to fail.
// Create the coordinator and store
let coordinator = NSPersistentStoreCoordinator(managedObjectModel: self.managedObjectModel)
let url = self.applicationDocumentsDirectory.URLByAppendingPathComponent(“SingleViewCoreData.sqlite”)
var failureReason = “There was an error creating or loading the application’s saved data.”
do {
try coordinator.addPersistentStoreWithType(NSSQLiteStoreType, configuration: nil, URL: url, options: nil)
} catch {
// Report any error we got.
var dict = [String: AnyObject]()
dict[NSLocalizedDescriptionKey] = “Failed to initialize the application’s saved data”
dict[NSLocalizedFailureReasonErrorKey] = failureReason
dict[NSUnderlyingErrorKey] = error as NSError
let wrappedError = NSError(domain: “YOUR_ERROR_DOMAIN”, code: 9999, userInfo: dict)
// Replace this with code to handle the error appropriately.
// abort() causes the application to generate a crash log and terminate. You should not use this function in a shipping application, although it may be useful during development.
NSLog(“Unresolved error \(wrappedError), \(wrappedError.userInfo)”)
abort()
}
return coordinator
}()
when i am retrieving the these tasks i am getting the error ” Definition conflicts with previous value”
let sortDescriptor = NSSortDescriptor(key: “lng”, ascending: false)
let sortDescriptor = NSSortDescriptor(key: “lat”, ascending: true)
Hi Ravi, thanks for posting this tutorial, appreciate if you could update the source code to the latest Xcode 8. I downloaded the file and while trying to compile it showed a “Command failed due to signal: Segmentation fault:11” error.
Thanks, great tutorial!
retrive jsondata then store in core data and then again new data retrive and store coredata and delete all old data and all time update in tableview
how to manage this portion