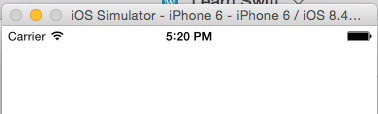
Status Bar appears at the top of your device displaying information such as battery left in your device and carrier details. The default style of status bar is black and looks as shown in the below screenshot.
But if your screen designs are dark then you can change the status bar style to Light Content. This can be done by adding an entry as part of info.plist file or by adding the required code in AppDelegate. And if you want to change status bar style for specific View Controllers then you can override the function preferredStatusBarStyle
Add entry to info.plist
Navigate to info.plist under SupportFiles folder and add a new entry “View controller-based status bar appearance” with value as NO.

This would prevent developers from changing the status bar style for specifc View Controlllers. Now you can speciy the preferred style by selecting the project target and choosing the value for Status Bar Style drop down under Deployment Info
Add code to AppDelegate
Instead of changing the option in Deployment Info, you can also do this through code by adding the following line inside AppDelegate’s didFinishLaunchingWithOptions method. Here we are changing the style to LightContent.
UIApplication.sharedApplication().statusBarStyle = UIStatusBarStyle.LightContent
Customize style for specific ViewController
If you wish to apply the style for specific View Controllers then override the preferredStatusBarStyle function as shown below. This would work only if the entry “View controller-based status bar appearance” in info.plist file is not set NO
override func preferredStatusBarStyle() -> UIStatusBarStyle {
    return UIStatusBarStyle.LightContent
}
Leave a Reply